Contact
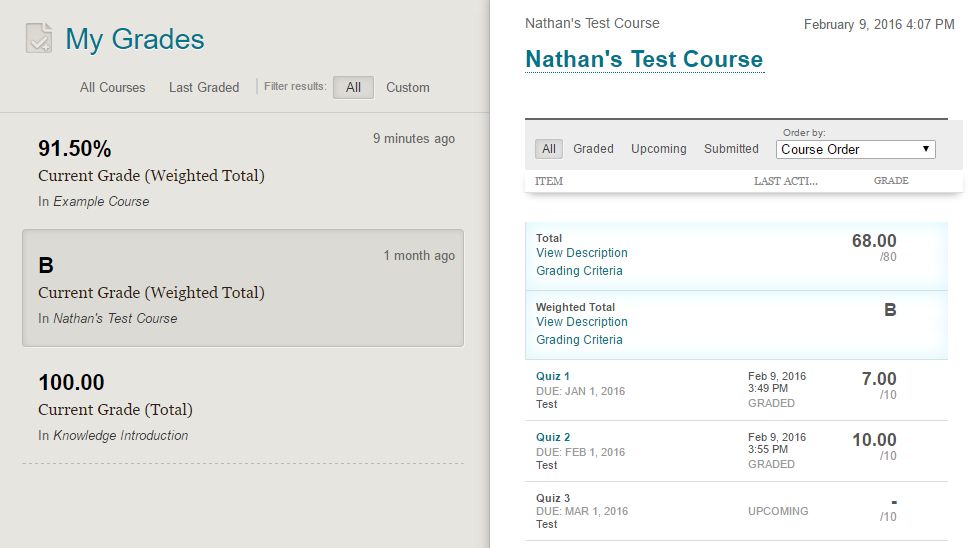
When students view their grades on Blackboard they use a tool called My Grades. The My Grades page is quite different than the Grade Center used by instructors, so it’s important to organize items in a way that makes sense to both students and instructors. When a student opens the My Grades tool from the My Knowledge page, this is what they see. (When a student opens the My Grades tool inside a specific course, the list of courses on the left will not appear but information on the right is the same.)

Notice that a grade appears in bold above each course on the left. This is the grade from whichever column is marked as the “External Grade” in the Grade Center (indicated by a green checkmark icon). For instructions on changing the External Grade column, visit Changing the External Grade column in the Grade Center. Students can switch between four display modes in My Grades: All, Graded, Upcoming & Submitted.
- All displays all the visible grade center items.
- Graded shows only those items that have already received a grade.
- Upcoming is the opposite of Graded, showing only items that have not yet received a grade.
- Submitted shows only items that have “needs grading” status such as Assignments and Assessments that require manual grading.
Students can choose between four sorting modes: Course Order, Last Activity, and Due Date (ascending/descending).
- Course Order shows items in the same order as they appear in the Grade Center.
- Last Activity sorts items in order of graded/submitted with the most recent changes at the top.
- Due Date sorts items in either ascending or descending order.
To make this page easier for your students to read, IDS recommends taking the following steps:
1. Keep the Total and/or Weighted Total columns near the beginning of the Grade Center.
We strongly recommend placing the Total and/or Weighted Total columns at the beginning of the Grade Center. This will ensure they appear at the top of the My Grades page when students are using the default “Course Order” sorting option.
2. Use either the Total or Weighted Total columns, but not both.
Except in special cases, we recommend only leaving one of the Total columns visible. If you’re using the Weighted Total column, the Total column can be deleted. If you’re using the Total column, you can hide or delete Weighted Total.
3. Hide or delete any other unused or unnecessary columns.
We recommend hiding or deleting any columns from your Grade Center that are not being used and which may confuse your students. If you’re not ready to delete a column, or a deployed item is preventing you from deleting it, we encourage you to use the “Show/Hide from Students” option to hide the column from student views. For more information, see our posts about hiding columns from students or deleting columns.
4. Specify the Due Date for each column.
We strongly recommend specifying a Due Date for each column. When you create a column in the Grade Center, or create a graded discussion board, assignment, assessment, etc., one of the options is to enter a Due Date. Adding a due date ensures the item will appear on the course’s Calendar, and also allows to sort the My Grades by due date. For more information, see our posts about using due dates. (coming soon)
5. Set the correct Total column as the External Grade.
Remember to designate whichever column you’re using for the total as the External Grade so that it appears next to your course’s name in the My Grades view. You may also want to change the Primary Display mode for that column to Letter. If you are using the Letter option, make sure you fix the Grading Schema so it matches your syllabus.
Hopefully, by following the steps outlined above, you can optimize the Grade Center so that the My Grades page is easy for students to read and understand.
Permalink Last updated 08/03/2017 by R. Davidson


