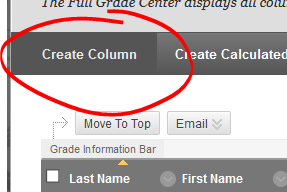
To create a Grade Center column, navigate to the Grade Center and click the Create Column button in the upper left.

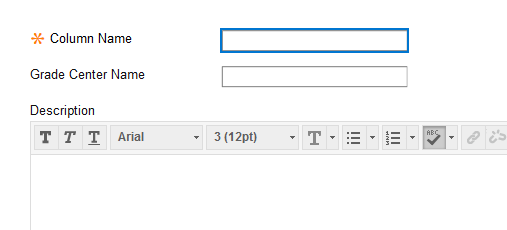
The first step in creating a column is entering the column name.

The Column Name is a required field. This is the name text that appears in the Grade Center by default, and on your students' My Grades page.
The Grade Center Name field lets you enter a short-name for the Grade Center's instructor view. For example, if you have a number of columns named Homework Assignment #01, Homework Assignment #02, Homework Assignment #03, etc., in the Grade Center you may see only "Homework Assignmen" over and over. You can use the Grade Center name to shorten these to HA 01, HA 02, HA 03. The students will still see "Homework Assignment #01" and so on, but in the Grade Center table, you'll see the shorter name.
The Description field is for providing students with a brief description of what assessment the column represents. This is completely optional.

Next, the display options, shows how the grade is shown in the Grade Center and on the students' My Grades page.
The Primary Display is shown to students and appears in the Grade Center. You can choose score, letter, text, percentage, or complete / incomplete. Broadly speaking, you'll be entering the students' grades as a score (unless you choose TEXT as the score type), Blackboard will then convert the score into the display option you select here.
The Secondary Display is not visible to students. It gives you the option to view a letter, percentage, or complete / incomplete symbol alongside the primary display you selected.

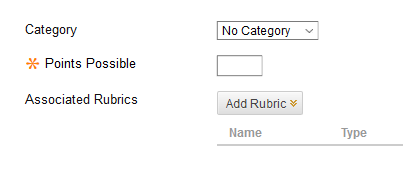
Setting an appropriate category is critical to creating a Weighted Total column (where you can use category to set a number of columns to be worth, say, 25% of the weighted total). Categories can be useful for filtering the Grade Center (briefly setting the Grade Center to display only Discussion items, for example).
Points possible indicates the total number of points for the assessment.
The Add RUBRIC button lets you add one or more rubrics (as created using Blackboard's rubric tool -- see link below) that can be used to score and provide feedback for student work.

The Due Date field lets you set a due date for the assignment. This date will appear on the students' My Grades page (if you decide to make the item visible to students), and it will also put the item on the students' Blackboard calendar.

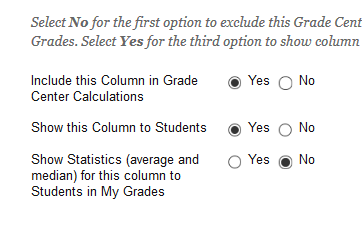
Finally, you'll need to decide whether the column should be included in the Grade Center calculations (select NO if it is a self-assessment, or if you'll be aggregating this column into a calculated column that will be used in the final calculations instead),
The "Show this Column to Students" option determines whether the item will appear on the students' My Grades page (as with all visibility options on Blackboard, this can be changed later if you choose),
The Show Statistics option determines whether students see the class average and mean for this assessment on their My Grades page.
Once you have the column set up, click SUBMIT to save your changes.
Permalink Last updated 01/17/2018 by R. Davidson


