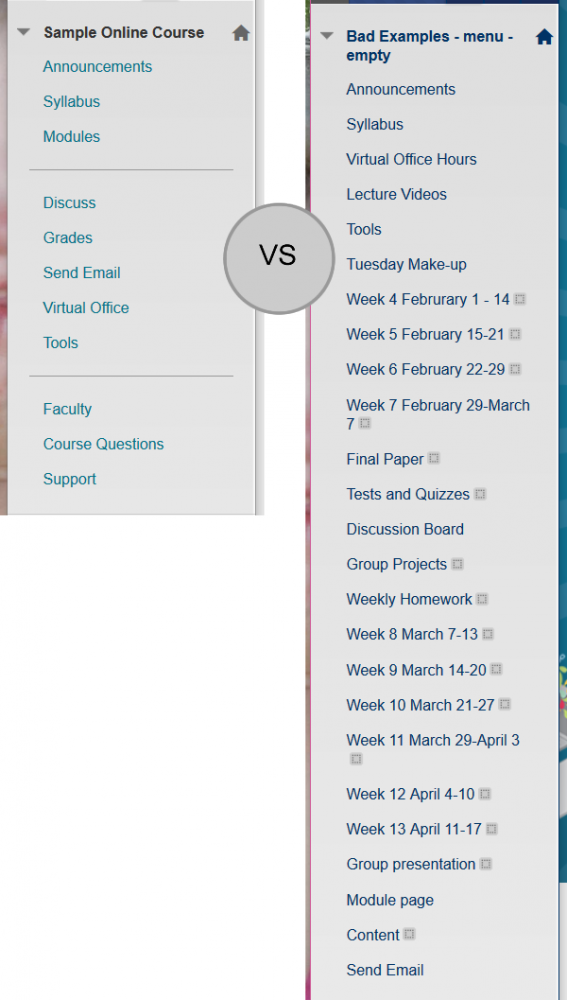
The course menu will be your students' main point of access to all the content and activities you've loaded into your course site.
The course menu can have any of the following:
Content Area: the most often used page type, this is a general holder for text; files of all kinds (PDFs, Word docs, PowerPoint presentations, video, audio, etc); embedded media; links to other activities & tools (discussion, wikis, blogs); assignment upload spaces; tests; and much, much more. Content area menu items will have an empty box beside them when EDIT MODE is on. These items will not be visible to students (until you add content).
Module Page: a replacement for the default ANNOUNCEMENTS landing page; you can use this space to aggregate a number of "What to pay attention to now"-type elements provided by Blackboard and other publishers. This includes announcements, task lists, student grades, etc.
Blank Page: a web page that may contain on-screen text, images, embedded media, and file attachments.
TOOL LINK: provides quick access to specific Blackboard tools such as Announcements, Discussion, Blogs, Email, etc.
Web Link: a link that points directly to another web site.
Course Link: a link that points to a particular part of the course itself, e.g., a particular assignment already inside a content area or a specific discussion area inside the discussion board
Default Course Menu
By default, you're provided with four menu items:
Announcements: The course landing page, a space where you can post updates and information for your students that relate to current events in the class. Classic uses include a summary of the last week's learning, introduction to the new week's topics, alerts about changing course conditions (class cancellations, test reminders, etc).
Syllabus: A content area and good place to put your syllabus and related items. If you develop a course schedule, visual syllabus, or other similar, overview-type content it should go here.
Content: A content area, good for foldering a range of course content -- topic-based modules, for example.
Tools: This page lists all the Blackboard tools available in your course. Announcements, blogs, discussion, groups, grades, send email -- all the tools available in the course can be found on this page. We recommend hiding any tools you're not using to streamline things for your students.
Modifying a Course Menu
At first, you may feel an urge to provide links in the course menu to all the content in your site. Tamp down this urge. An effective course menu balances linking students to key parts of the site that they will be using regularly while still being short and well organized.

To help improve the usability of your course menu, cluster menu items by type (put tools with tools, content with content, support with support) and make use of dividers and subheadings where it makes sense.
Blackboard has options for re-coloring your course menu. If you decide to manually re-color your menu, avoid using similar colors -- no red on red, blue on blue, etc. You should also lean toward higher-contrast colors -- black text on a yellow background is a better choice than white text on a yellow background.
There is also a "button" style menu option. We strongly discourage using the button style, as it decreases usability.
Some things to consider
Outside of the syllabus, if your menu item has only one piece of content in it, does it really need to be a menu item? Are there other, related menu items (possibly containing only a couple pieces of content) that it should be grouped with?
If your menu is running long, would it make sense to put a number of items together in folders under a single menu page?
How to Modify a Course Menu
MENU OPTIONS
If you want to edit or delete an existing menu item, put your pointer over it, then click the OPTIONS button.

RENAME A MENU ITEM
To rename a menu item, click the options button, and choose RENAME LINK. Type in your new name and hit enter on your keyboard to save the change.
![]()
SHOW / HIDE LINKS
To show or hide a menu item, click the options button and choose SHOW LINK or HIDE LINK. Hidden links will have a box with a slash through it next to the menu item text. The image below shows a Content Area with no content (empty box) that is also unavailable (so it won't be displayed, even after we add content).
![]()
MOVE A MENU ITEM
You can rearrange menu items by clicking on their outer-left edge then dragging them to a new position. When your pointer is appropriately placed, you'll see a cross-arrow pointer instead of the usual mouse pointer.
![]()
ADD A MENU ITEM
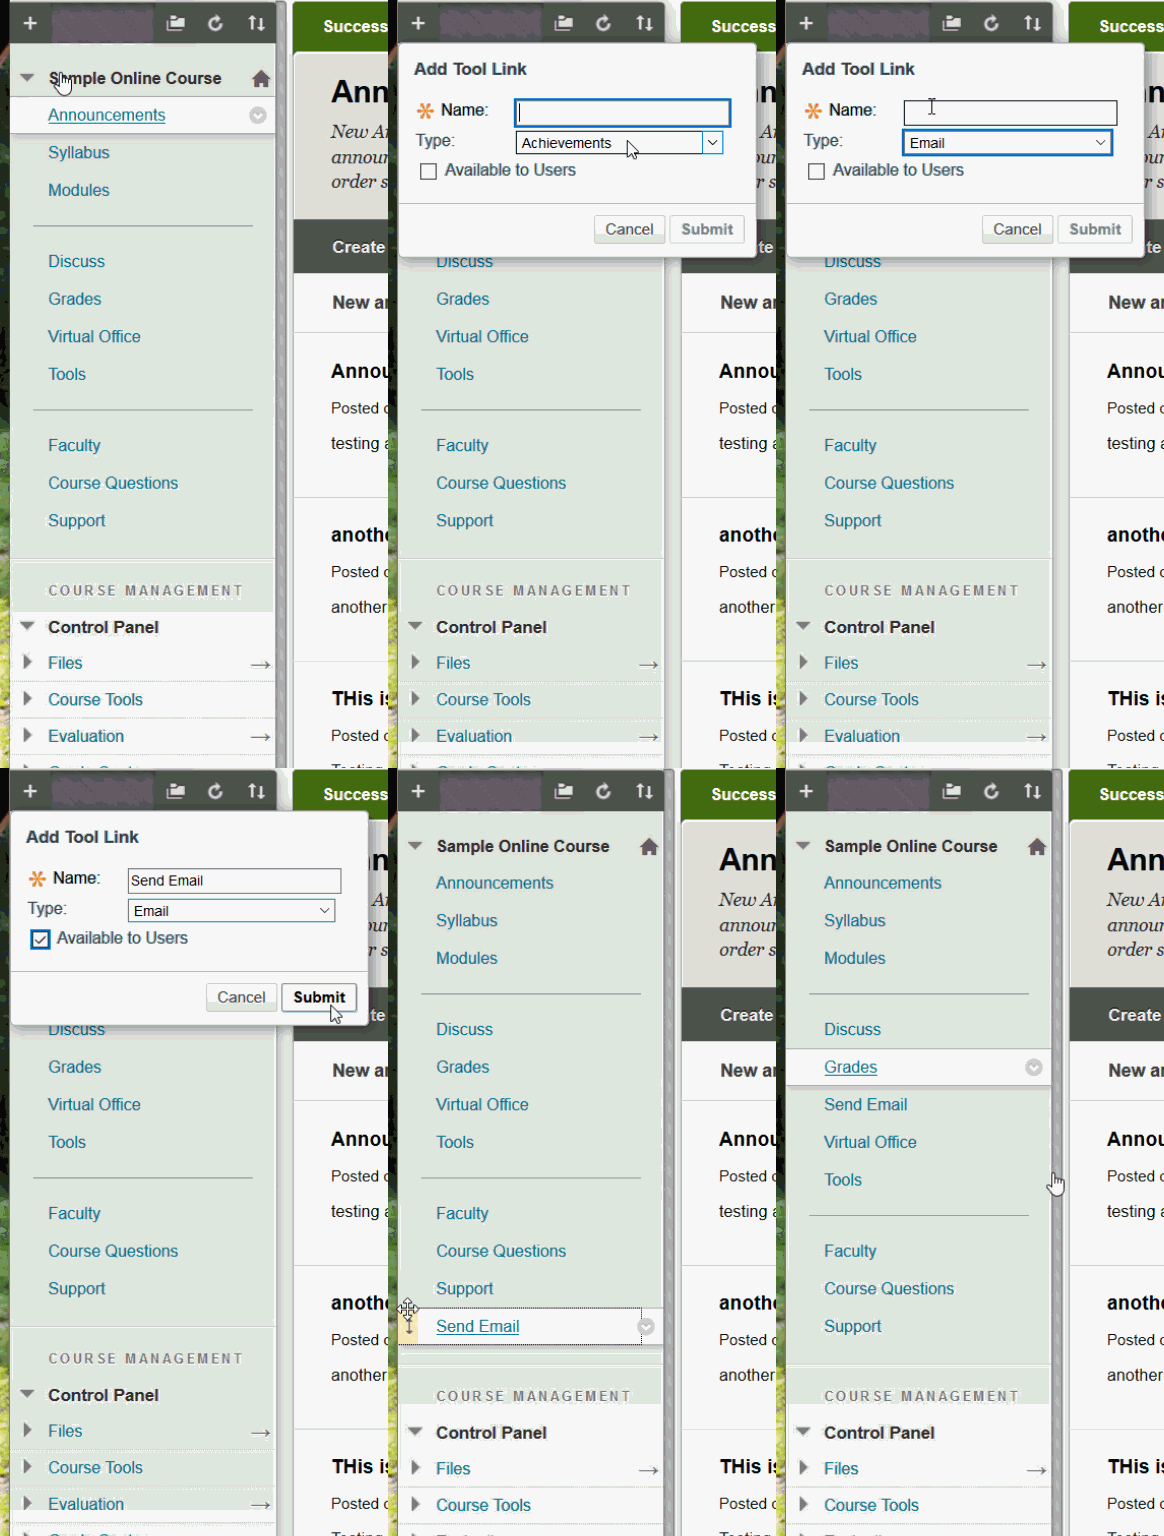
To add a menu item, point to the plus button at the top of the course menu. Select the type of menu item you wish to add, then enter the appropriate information. Below is an example of how to add and move a TOOL item.

Permalink Last updated 08/09/2018 by R. Davidson


